In this blog post, I will show you how to use GitHub Codespaces to make it easier for contributors to get started on your open-source project. We will set up a codespace for a .NET repository and configure it to install the required dependencies and tools.
What is GitHub Codespaces?
GitHub Codespaces is a feature that allows you to create a cloud-based development environment that is accessible from your browser (or Visual Studio Code, Rider). This means that you can start coding without having to install anything on your local machine. Codespaces are great for open-source projects because they make it easier for contributors to get started with your project.
Imagine you have a contributor who wants to fix a small issue in your documentation, but to do so, he has to set up a local development environment with all the dependencies and tools required to build your project. This can be a daunting task, especially for new contributors. With Codespaces, you can provide a pre-configured development environment that is ready to use with just a few clicks.
What does it cost?
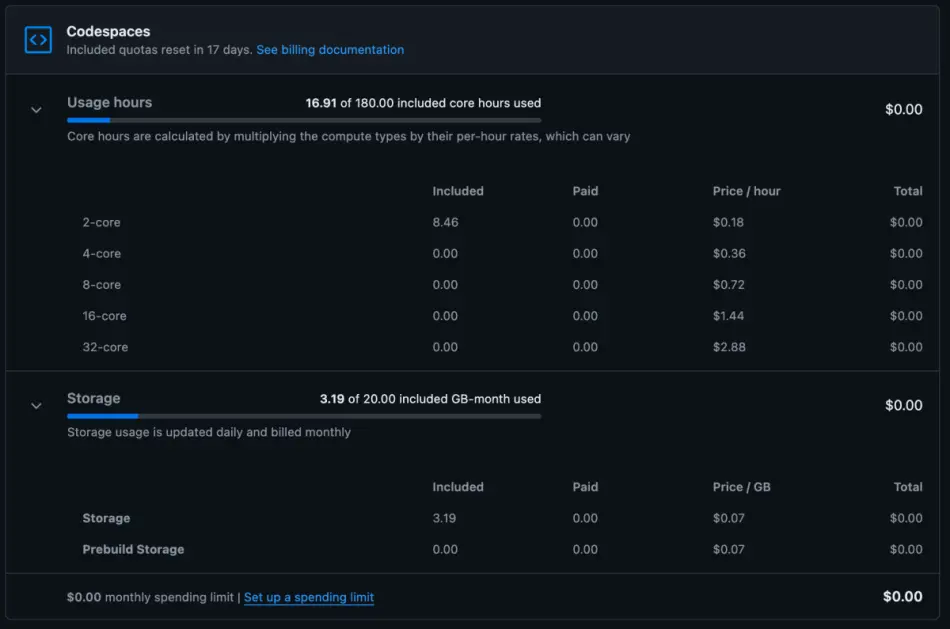
GitHub Codespaces will be billed per usage and storage. For a regular account you get 120 hours per month. For a pro account you get 180 hours per month. The usage is mainly defined by the number of cores you take. It starts with 2 cores and can go up to 32 cores. The storage is 20GB and can be extended as well. The core is basically a multiplier for the cost. So if your codespace is open for one hour and uses 2 cores, you will be billed for 2 hours. If you use 32 cores, you will be billed for 32 hours. But even with 120 hours per month, you can go far with a regular account. Here is a small example of the cost from my personal account (I do have a pro account):
GitHub Codespaces is paid for either by an organization, an enterprise, or a personal account. So let's imagine you have a project and provide a codespace, you are not billed. You have to setup an organization or enterprise account and invite to be "able to be billed". If a contributor uses your codespace (or better the codespace definition) he will be billed with his account.
More information can be found here: https://docs.github.com/en/billing/managing-billing-for-github-codespaces/about-billing-for-github-codespaces
Creating the Codespace
To create a Codespace for your project, you need to add a .devcontainer folder to your repository. This folder contains a devcontainer.json file that defines the configuration of the Codespace. This file specifies the Docker image that will be used to create the Codespace, as well as any additional dependencies and tools that need to be installed.
I will guide you through the one we have for NCronJob:
// For format details, see https://aka.ms/devcontainer.json. For config options, see the
// README at: https://github.com/devcontainers/templates/tree/main/src/dotnet
{
	"name": "C# (.NET)",
	// Or use a Dockerfile or Docker Compose file. More info: https://containers.dev/guide/dockerfile
	"image": "mcr.microsoft.com/dotnet/sdk:9.0-preview",

	// Features to add to the dev container. More info: https://containers.dev/features.
	"features": {
		"ghcr.io/devcontainers/features/dotnet:2": {
			"version": "latest"
		}
	},

	// Configure tool-specific properties.
	"customizations": {
		"vscode": {
			"extensions": [
				"ms-dotnettools.csdevkit",
        		"yzhang.markdown-all-in-one",
				"vscode-icons-team.vscode-icons",
				"me-dutour-mathieu.vscode-github-actions"
			]
		}
	},

	"postCreateCommand": "bash .devcontainer/post-install.sh"

	// Uncomment to connect as root instead. More info: https://aka.ms/dev-containers-non-root.
	// "remoteUser": "root"
}
Here the most important bits:
name: The name of the Codespace. I hope that is self-explanatory.image: The Docker image that will be used to create the Codespace. In this case, we are using the official .NET SDK image from Microsoft. As you can see, we are using the preview version of .NET 9.0. So the whole CLI is already installed!features: This section allows you to add additional features to the dev container. Kind of another layer on top of your docker image. In this case, I want to add thelatestsdk version (aka .net 8 at the time of writing). For another repository where we are still supporting.netcoreapp3.1onwards (I know for ages not been supported, but it doesn't cost us anything), I added:"additionalVersions": "6.0,5.0,3.1".customizations: This section allows you to customize the Codespace by installing additional tools and extensions. In this case, we are installing some Visual Studio Code extensions that are useful for .NET development. You can easily grab the identififer from the marketplace.postCreateCommand: This command will be executed after the Codespace has been created. Basically, any shell command can be used here. In this case, we are running a shell script that installs some additional dependencies and tools.
In our case we have:
#/bin/bash

# Update apt
apt update

# Install mkdocs
apt install -y mkdocs

# Trust dotnet developer certs
dotnet dev-certs https --check --trust
We want to install mkdocs as we are using it for our documentation. We also want to trust the dotnet developer certs. This is important as we are using HTTPS for our local development. All of those steps someone would have to do manually if he wants to contribute to our project. With Codespaces, this is done automatically! This happens when the codespace is created for the first time. If you want to update the codespace, you can do this by clicking on the "Rebuild" button in the Codespaces tab of your repository. If you are not using the codespace you can stop it. This will not delete it, but it will not be billed. It does that autommatically after a while anyway.
Of course you can combine this with the magic of VS Code itself. For example have a look at our tasks.jsons:
{
    // See https://go.microsoft.com/fwlink/?LinkId=733558
    // for the documentation about the tasks.json format
    "version": "2.0.0",
    "tasks": [
        {
            "label": "Serve Docs",
            "type": "shell",
            "command": "mkdocs serve"
        },
        {
            "label": "Run all tests (Release Mode)",
            "type": "shell",
            "command": "dotnet test -c Release"
        }
    ]
}
If you want to update the docs you can just call "Run Tasks" followed by "Serve Docs" and you have a local server running with the documentation. VS Code even notice that you a port was opened and asks you nicely if you want to open it in the browser.
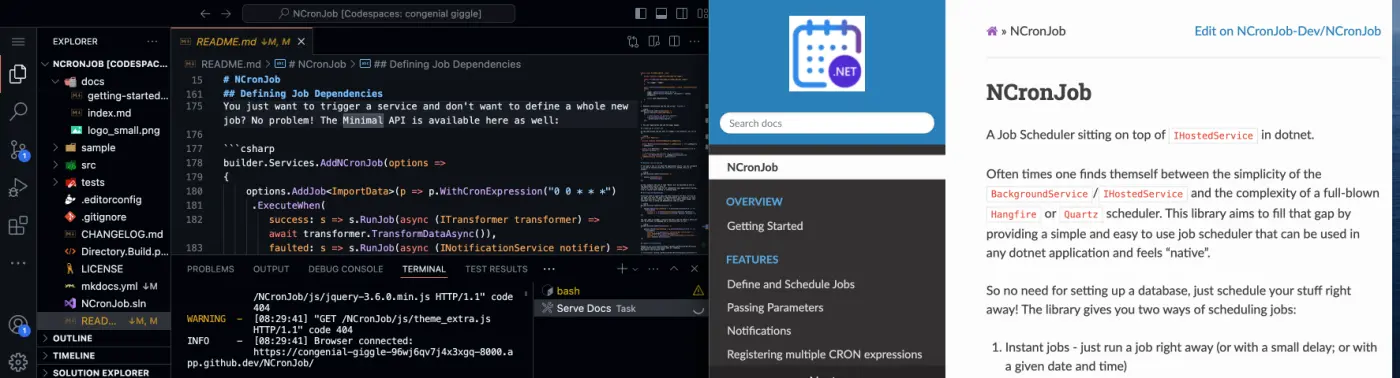
Of course we can also run tests and everything, as our Codespace is a full development environment (see the C# Dev Kit extension we installed).
Once you have checked in all the stuff you can see, select the Codespace in the GitHub UI.
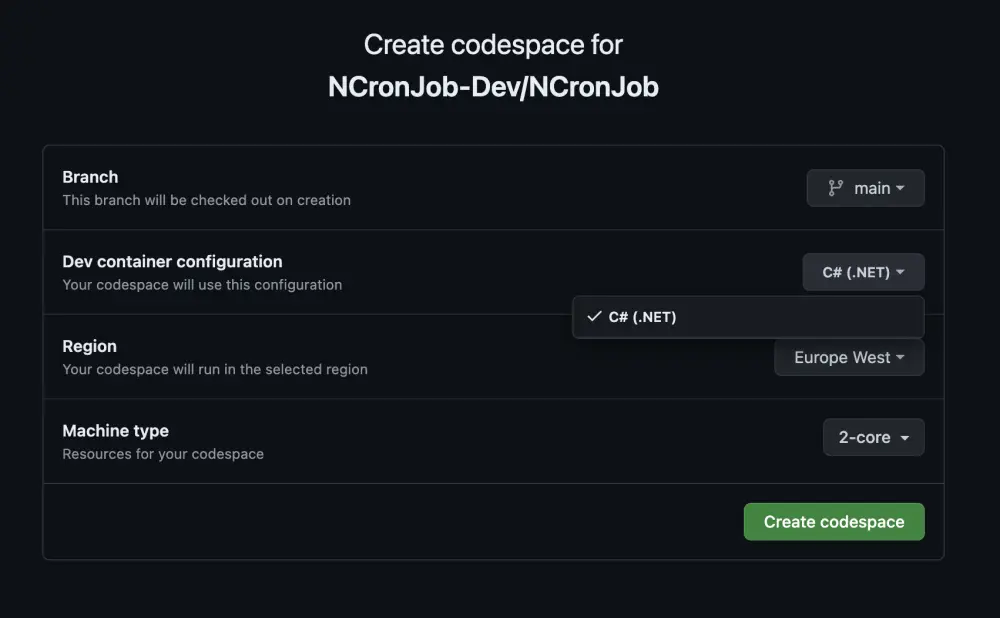
You can also share a deep link (this will open and create a codespace for the NCronJob repository for you):
![]()
Conclusion
GitHub Codespaces is a great feature that makes it easier for contributors to get started with your open-source project. By providing a pre-configured development environment that is accessible from the browser, you can reduce the barrier to entry for new contributors and make it easier for them to start contributing to your project. I hope this blog post has given you some ideas on how to use Codespaces to improve your open-source project.