As software engineers, we try to automate as much as possible. That is the reason we built our continuous integration and continuous deployment platform. I will show you how you can utilize GitHub Actions, GitHub Pages, DocFx and of course .NET to create your own pipeline that with one click does the following things:
- Run tests and build your application
- Release the application for example to nuget
- Create a Release on GitHub with Release notes
- Update the documentation utilizing GitHub Pages and DocFx
So let's go through step by step. At the end, I will post the link to the repository if you just want to use this. You will see how to set up the repository, how to automatically generate the documentation, and how then we can release everything with a single button on demand.
Create the Repository
The first step is not new for most of us. Anyway, it has to be done nevertheless, so let's head over to GitHub and create a new repository.
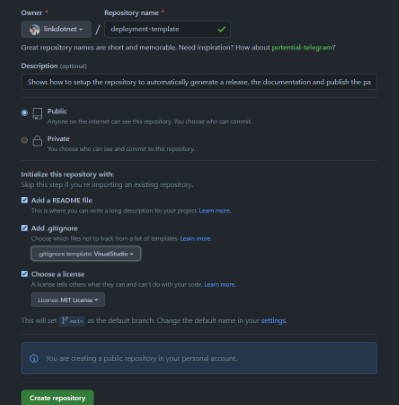
I used the default .gitignore plus the default README.md. As license, I choose MIT as I always choose this. All of my public repositories are free to use in private as well as in business projects. But feel free to use whatever license suits you best. Now we just clone the repository to our local PC. I am a heavy user of the git cli, therefore you will see a lot of git command line examples instead of GUI. Please take the tool you are most comfortable with.
git clone https://github.com/linkdotnet/deployment-template.git and there you have your new repository.
The folder structure
Now before I start to fill the repository with live I want to showcase the folder structure I will use throughout this post. Please feel free to adapt this to your needs. First I'll create 4 new folders in the root directory
.githubwhere the GitHub actions will livedocswhere our documentation will live (done by DocFx)srcwhere our production code will livetestswhere our test code will live
Our library and test project
Now it is time to create a new solution, including a library project and a test project. I will utilize the command line for that. Feel free to use your favorite IDE.
In the root directory, I will use the following commands:
dotnet new sln- Creates our solution. If you don't provide any arguments the solution will have the same name as the directory it is created. With-nyou can pass the name for the solution like this:dotnew new sln -n MyFancySolution.dotnet new classlib --output src/MyLibrarywill generate our class library called "MyLibrary" in thesrcdirectory.dotnet sln add src/MyLibrary/will add the newly added project to our solution.dotnet new xunit --output tests/MyLibraryTestswill create our xUnit test project undertests/MyLibraryTests. You can also takeNUnitor any other testing framework.dotnet sln add tests/MyLibraryTestswill add the test project to our solution.
The first step is done! You can commit your work and push it to GitHub.
Optional - StyleCop and SonarAnalyzers
This part is optional and you don't have to use it at all but I use both packages in almost every project I use. The StyleCop analyzers as well as the SonarAnalyters.CSharp analyzers check your code and warn you if you have a potential issue. But furthermore they can also enforce some coding styles, which is very nice. Another big plus is, that you can configure them to throw an error if a public API is not documented. I highly recommend them to use them, we will see later why the last point is very important.
Those two packages are a bit special to me: I want them literally in every project, I even add them to my test projects. Therefore I use the Directory.Build.props file so that all my csproj files automatically install those two packages. I have a deep dive about this topic here in my blog.
So I'll add those files. If you want head over to the repository and just copy & paste those 3 files:
- Directory.Build.props
- stylecop.analyzers.ruleset
- stylecop.json
The preset I use is a nice mixture. Please feel free to adopt the rules.
The library
Until now our library is pretty empty and we have zero tests. Not that great. So we will create a new example class that has one public function. I will use the following function:
namespace MyLibrary;

/// <summary>
/// Can print "Hello World" to the user.
/// </summary>
public class HelloWorldPrinter
{
    /// <summary>
    /// Returns "Hello World" <paramref name="times"/> on the Console.
    /// </summary>
    /// <param name="times">How many times Hello World should be displayed.</param>
    /// <returns>"Hello World" multiple times delimited by a newline.</returns>
    public string GetHellWorld(int times)
    {
        var hello = Enumerable.Range(0, times).Select(_ => new string("Hello World"));
        return string.Join(Environment.NewLine, hello);
    }
}
As you see I created a new HelloWorldPrinter which just returns "Hello World" n times. But also important we have documentation.
This will be very important in a few steps. I would encourage you to document your code (public API in your library, not everything!).
Also add a small test:
using MyLibrary;
using Xunit;

namespace MyLibraryTests;

public class UnitTest1
{
    [Fact]
    public void ShouldReturnHelloWorldThreeTimes()
    {
        const string expected = @"Hello World
Hello World
Hello World";
        var sut = new HelloWorldPrinter();

        var str = sut.GetHellWorld(3);

        Assert.Equal(expected, str);
    }
}
Let's commit this and move forward.
The first action: Check the build on commits
Now we have our first test with the first logic. From now on we want to build and test our application with every, single commit. For that, we will create a GitHub action. Inside the .github folder create a new subfolder called workflows.
And there we create our first action: dotnet.yml. You can name it as you wish. I will not go too much into detail about how the actions work. You need a small understanding of how they work, but don't worry. Here and here for starters can help you out. I found them quite self-explaining:
name: .NET

on:
  push:
    branches: [ main ]
  pull_request:
    branches: [ main ]

jobs:
  build:

    runs-on: ubuntu-latest

    steps:
    - uses: actions/checkout@v2
    - name: Setup .NET
      uses: actions/setup-dotnet@v1
      with:
        dotnet-version: 6.0.x
        include-prerelease: true
    - name: Restore dependencies
      run: dotnet restore
    - name: Build
      run: dotnet build --no-restore -c Release
    - name: Test
      run: dotnet test -c Release --no-build
What it does: On every push to main or pull request which targets main do the following steps:
- Checkout our repository to the GitHub Action Agent
- Restore all our dependencies
- Build our application
- And run the tests
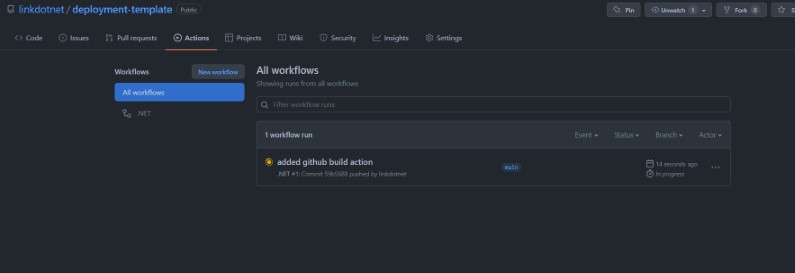
Let's commit this and head over to the Actions tab in your repository.
 )
)
And everytime the build fails, one of the analyzers sees an issue or one of our tests fail you will get an indication (and even an email if set up). You can create even a status badge which you can put into your README.md. It looks something like this: ![]() .
.
CHANGELOG.md
This is the first part of the documentation. When we release we don't want to write release notes, we want them automatically generated and put into GitHub. For that we will use a file called CHANGELOG.md which we will put into the root of the repository. That is not a special file you can name it as you wish, we make it special later 😉.
The structure of that file is by convention. The idea is from keepachangelog. When you add a new feature or a fix we will put it into the Unreleased section. Once we create a release we leverage this information.
CHANGELOG.md
# Changelog

A nice description could be here.

<!-- The format is based on [Keep a Changelog](https://keepachangelog.com/en/1.0.0/) -->

## [Unreleased]

### Added
 - `HelloWorldPrinter` which creates the user

### Fixed
 - Made the world a bit better!
The idea is simple, once we release we transform the Unreleased part into the current release and tag it as such. So the release should have the following content:
### Added
 - `HelloWorldPrinter` which creates the user

### Fixed
 - Made the world a bit better!
And our CHANGELOG.md file should look like this afterwards
## [Unreleased]

## [1.0.0] - 2022-04-10

### Added
 - `HelloWorldPrinter` which creates the user

### Fixed
 - Made the world a bit better!
How this is done I'll show later.
DocFx - Document our application and API
DocFx is a static document generator. In our case it will take our C# projects and some markdown and will create a website. Perfect conditions for our free GitHub Page where we can host exact those contents.
Before we create any documentation we need to install DocFx. There are multiple ways. I like to install it via chocolatey but there are different options. I will just link the Quickstart guide if you need different setup. With chocolatey, which is a package manager for windows, you can just install it via the powershell with elevated rights:
choco install docfx. Restart your console and you should be able to enter the following command into your shell: docfx --version and should get the current version of DocFx. Once we have this we can set up our project.
In the doc folder we can create docfx with the following command:
docfx init -q -o site --apiSourceFolder ../../src/
docfx initwill create the project.-qmeans quite so we don't have a lot of console output, you can omit this parameter if you wish-o sitethis will be the output. In this case that would mean all the doc content is underdocs/site.--apiSourceFolder ../../src/we give docfx a hint where oursrcis. This is relative from the newly createddocfx.jsonfile which lives indocs/site.
Now you can go into the new site folder and make a small change in the docfx.json. Change the first part of "files" from "src/**.csproj" to just "**.csproj". The reason is simple you can in theory host all your code inside the src folder which was created by docfx. I am personally not a big fan of that, but this is up to you.
{
  "metadata": [
    {
      "src": [
        {
          "files": [
            "**.csproj"
          ],
          "src": "../../src/"
        }
      ],
Now we are good to go and can have a look at our documentation. For that head again one directory up to docs and execute the following command: docfx site/docfx.json. This will compile all the files and generates the API Documentation. And afterwards call docfx serve site/_site. This will serve the webpage on localhost:8080. It should look something like that.
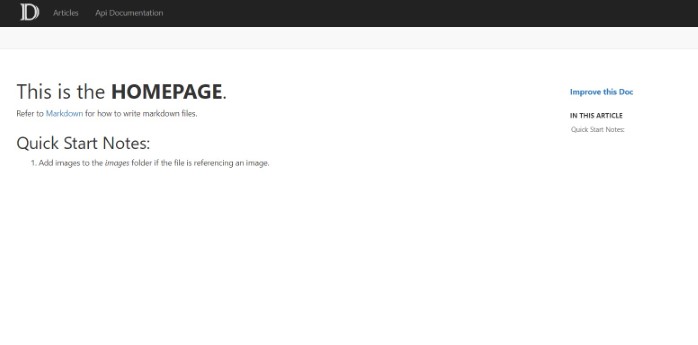
On the top you also have the API Documentation which should be automatically created. Now I hope it made sense to you that we enforce public API documentation. For convenience I would add a cmd or bash script which does those two commands together in the docs folder:
docfx site/docfx.json
docfx serve site/_site
I will not go into details how to write the documentation, but provide you this link where you can get more information. Now is the perfect time in point to commit our work and continue the journey. Take a break if you wish 😉.
Create the GitHub Page
Now that we have the documentation in place, we can make us thoughts where and how we can deploy this. At best we can do this on demand or whenever we have a release. We don't necessarily want this on every commit because then we would show the user new or changed information which doesn't make sense to him at this point in time.
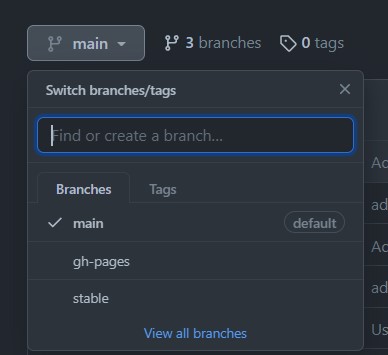
To begin we want to create 2 new branches. One we call stable and another one we call gh-pages. The latter one is pretty obvious. We use this branch to serve our documentation. stable will be our mirror of the latest release or the latest release with updated documentation. Now why do we have two branches? One main and one stable. Just imagine you just want to change your documentation without pushing real content or releasing something, that would be hard with one branch. Therefore we have stable. If we only want to update documentation we merge changes into stable and main (we can also automate that).
After we created our branches, we head over to the settings page to the GitHub Pages section. There select as Source the gh-pages branch. You will notice that immediately an action is started.
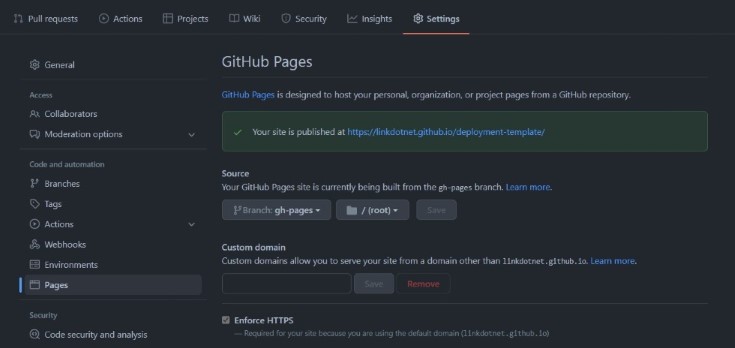
Afterwards you can click on the link offered to you above the Source you changed a few seconds ago. Now that doesn't look that bad but it isn't the content we want to have.
The missing piece is the following: Everytime someone or something pushes to stable we want to recompile our documentation. And we do the same as we did locally earlier. So let's head over to the github/workflow folder and add a new yml file. I will call it docs.yml. The action will:
- Checkout our repository
- Download docfx
- Run docfx
- Publish the changes to the
gh-pagesbranch
name: Docs

on:
  push:
    branches:
    - stable
  workflow_dispatch:

jobs:
  generate-docs:

    runs-on: windows-latest

    steps:
    - uses: actions/checkout@v2

    - name: Setup .NET 6.0
      uses: actions/setup-dotnet@v1
      with:
        dotnet-version: 6.0.x

    - name: Setup DocFX
      uses: crazy-max/ghaction-chocolatey@v1
      with:
        args: install docfx

    - name: DocFX Build
      working-directory: docs
      run: docfx site\docfx.json
      continue-on-error: false

    - name: Publish
      if: github.event_name == 'push'
      uses: peaceiris/actions-gh-pages@v3
      with:
        github_token: ${{ secrets.GITHUB_TOKEN }}
        publish_dir: docs/site/_site
        force_orphan: true
Now regarding the secrets.GITHUB_TOKEN: This is predefined and you don't have to set this. We will learn/use "real" secrets in just a bit.
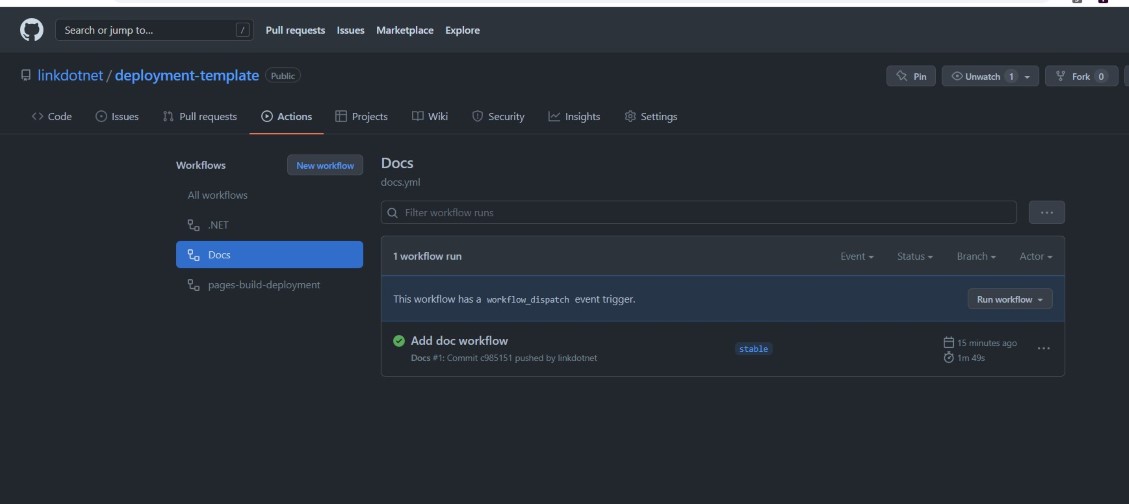
Make sure everything you do is on the main branch. We will barely interact with the stable branch. When you push those changes, you can go to the Github actions and select our newly defined Docs workflow via Run workflow. After a while you can check again your GitHub page and voila you should see a familiar page. The one from DocFx and our API.
Hurray, we did it. We got really far right now. A lot of processes are automated, but we can do more!
Automatically back-merge stable to main
The next workflow will automatically back merge any changes from stable to main. If the merge was not successful we will create a new issue on the very same repository so that the author is aware of the problem and has to resolve the conflict manually.
Create a new workflow file (under .github/workflows) named backmerge.yml with the following content:
name: Back merge to main
on:
  push:
    branches:
      - stable
  workflow_dispatch:

jobs:
  back-merge:
    if: github.event.pull_request.merged == true
    timeout-minutes: 2
    runs-on: ubuntu-latest
    steps:
    - uses: actions/checkout@v2
    - name: Set Git config
      run: |
          git config --local user.email "[email protected]"
          git config --local user.name "Github Actions"
    - name: Merge master back to dev
      run: |
          git fetch --unshallow
          git checkout main
          git pull
          git merge --no-ff origin/stable -m "Auto-merge stable back to main"
          git push

    - name: Create issue if failed
      if: failure()
      uses: JasonEtco/create-an-issue@v2
      env:
        GITHUB_TOKEN: ${{ secrets.GITHUB_TOKEN }}
      with:
        filename: .github/backmerge-failed.md
        update_existing: true
The last bit is a bit interesting. If we fail we create a new issue. As template I defined a file under .github/backmerge-failed.md. This will be the content of the created issue by the GitHub action. I use a very simple content like this:
---
title: Back merge from stable to main failed
labels: input needed
---

The back merge from stable to main failed. Please investigate the GitHub Action and resolve the conflict manually.
The title will be used as title of the issue and it can also automatically assign labels.
Set some basic NuGet information in our csproj
We are so close. Stay with me we are almost over the finish line. The next thing which is important is we need an unique ID for our library or application. You can do this via Visual Studio or directly edit your csproj. I use JetBrains Rider for that:
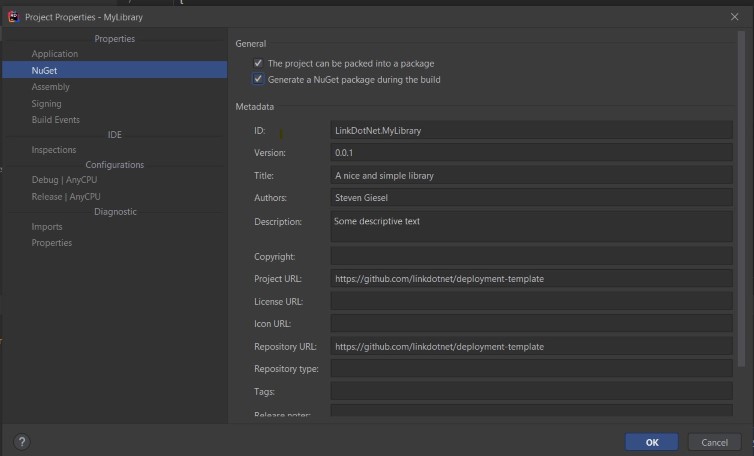
Now set the version to something very low like 0.0.1 and build the project. Also make sure that you generate a nuget package at least once. We need this later to generate the NuGet API Key. After you build the project and have a nuget package, please remove the following line again <GeneratePackageOnBuild>true</GeneratePackageOnBuild>. Otherwise this could lead to problems at the end.
Getting some secrets!
Now we need 2 secrets to add to our repository: Our NuGet API so we are allowed to publish packages and a Personal Access Token.
NuGet
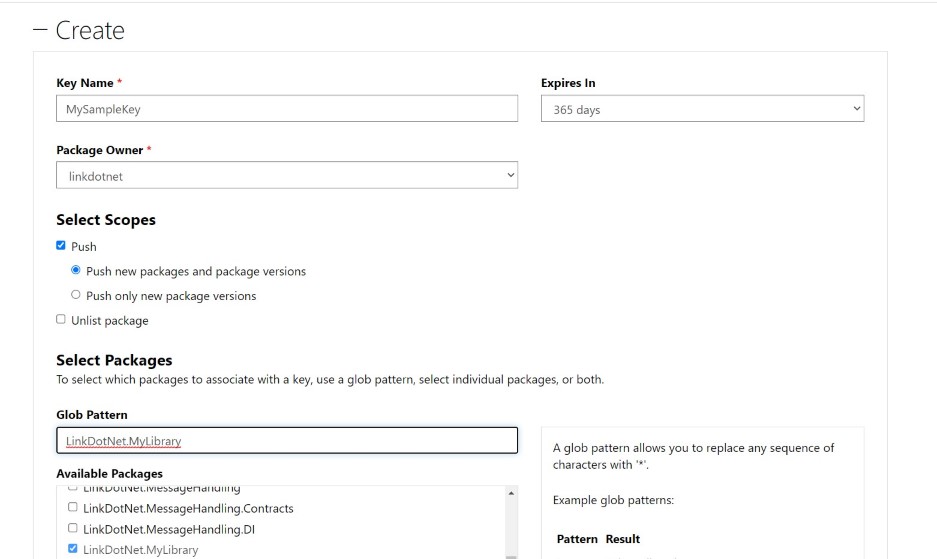
Head over to Nuget to create a new key.
Because we don't have a package now, we have to use upload our earlier created package with a very low version. Don't worry we can directly unlist this afterwards, but API keys are scoped to packages. So if your package is not known, we can't create on. Therefore just upload the earlier created nuget package.
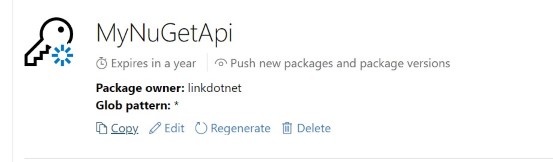
After we uploaded the package, we can directly generate the token:
Copy the key:
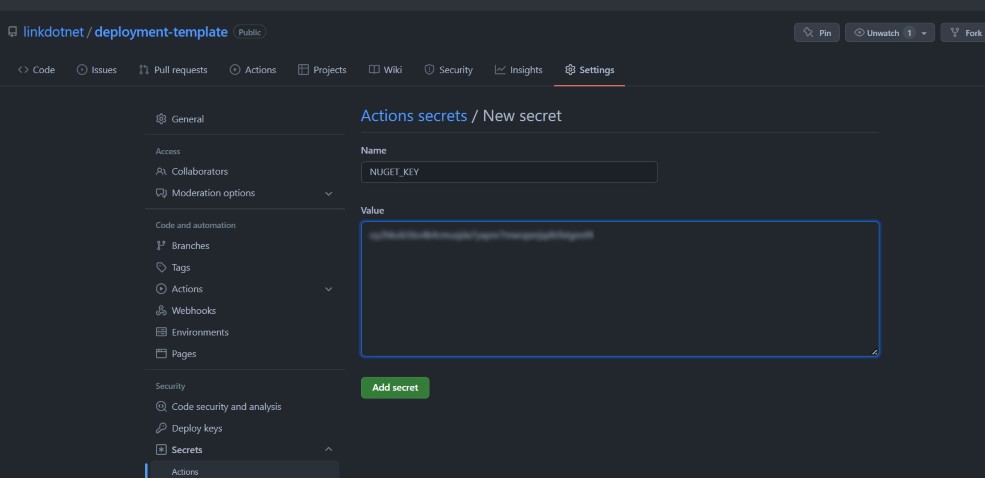
Afterwards go to your repository and add the NuGet Key as secret:
Personal Access Token
I explained earlier that you already have some kind of access token called secrets.GITHUB_TOKEN which we can use for actions, but they have one big problem: Just imagine you have a action which pushes some changes to our stable branch. Wouldn't it be nice that our doc action picks this up and pushes the changes to the gh-pages branch? Well that only works with a Personal Access Token short PAT.
For that you have to head over to your Token site and Generate new token. Only the repo part has to be ticked on for the action we will write.
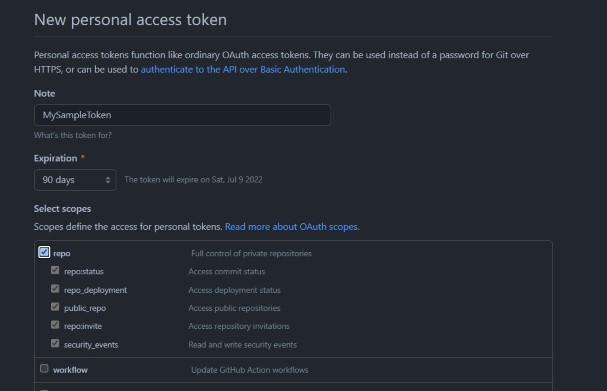
Copy the Token as shown below:
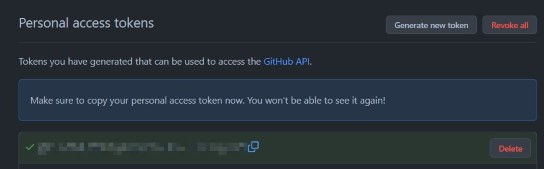
And at last create a new secret in our repository with the content of our PAT. So we should have 2 secrets in our repository.
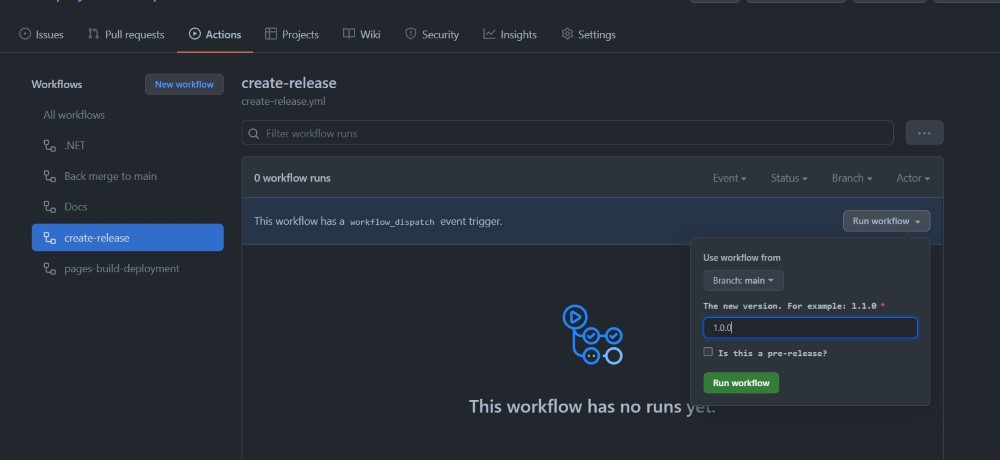
Create a release
The last part has come. We bring all the information together and create a release. Now the idea is simple, we have two inputs:
The new version which the user has to provide. Something like 1.0.0 or 1.2.0-beta.2. We will use this version in the following places:
- We change Unreleased in our CHANGELOG.md to the given version
- The NuGet package will have this version
- The release will have this version
- We will create a tag with that version
The other input is if we have a pre-release. There is only one place where this is important: the GitHub Release Page. NuGet doesn't care about this flag. NuGet uses Semantic Versioning to determine if a package is a pre-release or not. Basically everything which has a string after the third digit is considered a pre-release (1.0.0-rc.1).
Also once our workflow is done it automatically triggers the updates of the documentation as we merge changes to stable as well. Perfect! We are in full control when we release, but once we decide to do so, everything is fully automated.
name: create-release

on:
  workflow_dispatch:
    inputs:
      versionIncrement:
        description: 'The new version. For example: 1.1.0'
        required: true
        default: ''
      prerelease:
        description: 'Is this a pre-release?'
        type: boolean
        required: false
        default: false

jobs:
  release:
    name: Publish new release
    runs-on: ubuntu-latest
    steps:

    - name: Checkout repository
      uses: actions/checkout@v2
      with:
        token: ${{ secrets.PAT }}
        persist-credentials: true
        fetch-depth: 0

    - name: Setup dotnet
      uses: actions/setup-dotnet@v2
      with:
        dotnet-version: 6.0.x
    - name: Test
      run: dotnet test -c Release --no-build

    - name: Get changelog entries
      id: changelog
      uses: mindsers/changelog-reader-action@v2
      with:
        version: Unreleased
        path: ./CHANGELOG.md

    - name: Update CHANGELOG file
      uses: thomaseizinger/[email protected]
      with:
        version: ${{ github.event.inputs.versionIncrement }}

    - name: Set git config
      run: |
        git config --local user.email "[email protected]"
        git config --local user.name "LinkDotNet Bot"

    - name: Commit changes and push changes
      run: |
        git add CHANGELOG.md
        git commit -m "Update Changelog.md for ${{github.event.inputs.versionIncrement}} release"
        git push origin main

    - name: Create release on GitHub
      uses: thomaseizinger/[email protected]
      env:
        GITHUB_TOKEN: ${{ secrets.PAT }}
      with:
        tag_name: v${{ github.event.inputs.versionIncrement }}
        target_commitish: ${{ env.RELEASE_COMMIT_HASH }}
        name: v${{ github.event.inputs.versionIncrement }}
        body: ${{ steps.changelog.outputs.changes }}
        draft: false
        prerelease: ${{ github.event.inputs.prerelease }}

    - name: Create release package
      run: |
        dotnet pack -c RELEASE -p:PackageVersion=${{ github.event.inputs.versionIncrement }} -o ${GITHUB_WORKSPACE}/packages

    - name: Upload to nuget
      run: |
        dotnet nuget push ${GITHUB_WORKSPACE}/packages/*.nupkg -k ${{ secrets.NUGET_KEY }} -s https://api.nuget.org/v3/index.json --skip-duplicate --no-symbols

    - name: Merge main to stable
      run: |
        git fetch
        git checkout stable
        git pull
        git merge --no-ff -X theirs origin/main -m "Updating to newest release"

    - name: Push changes
      uses: ad-m/github-push-action@master
      with:
        github_token: ${{ secrets.PAT }}
        branch: stable
        force: true
A few details here:
- name: Push changes
      uses: ad-m/github-push-action@master
      with:
        github_token: ${{ secrets.PAT }}
        branch: stable
        force: true
We are using our PAT so that all actions, as explained on top, will trigger.
    - name: Create release on GitHub
      uses: thomaseizinger/[email protected]
      env:
        GITHUB_TOKEN: ${{ secrets.PAT }}
      with:
        tag_name: v${{ github.event.inputs.versionIncrement }}
        target_commitish: ${{ env.RELEASE_COMMIT_HASH }}
        name: v${{ github.event.inputs.versionIncrement }}
        body: ${{ steps.changelog.outputs.changes }}
        draft: false
        prerelease: ${{ github.event.inputs.prerelease }}
This will create the release with the given tag defined as our variable. We will add v in fron of it stick to the "norm". We can also see that we use the content of CHANGELOG.md to fill the body of our release page.
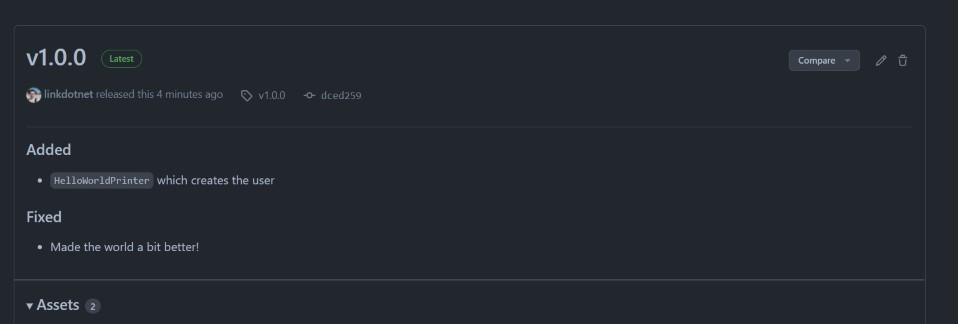
Results
If you commit this file and head over to the actions panel.
After it successfully run through, we can see we have a new commit on main, plus a new entry in the release section of our repository:
Let's have a look at our CHANGELOG.md:
# Changelog

A nice description could be here.

<!-- The format is based on [Keep a Changelog](https://keepachangelog.com/en/1.0.0/) -->

## [Unreleased]

## [1.0.0] - 2022-04-10

### Added

-   `HelloWorldPrinter` which creates the user

### Fixed

-   Made the world a bit better!

[Unreleased]: https://github.com/linkdotnet/deployment-template/compare/1.0.0...HEAD

[1.0.0]: https://github.com/linkdotnet/deployment-template/compare/902a59583c17b4e0c437e156c038bd25ac2958f0...1.0.0
Also perfect! The last thing which is important is that our package got published on NuGet:
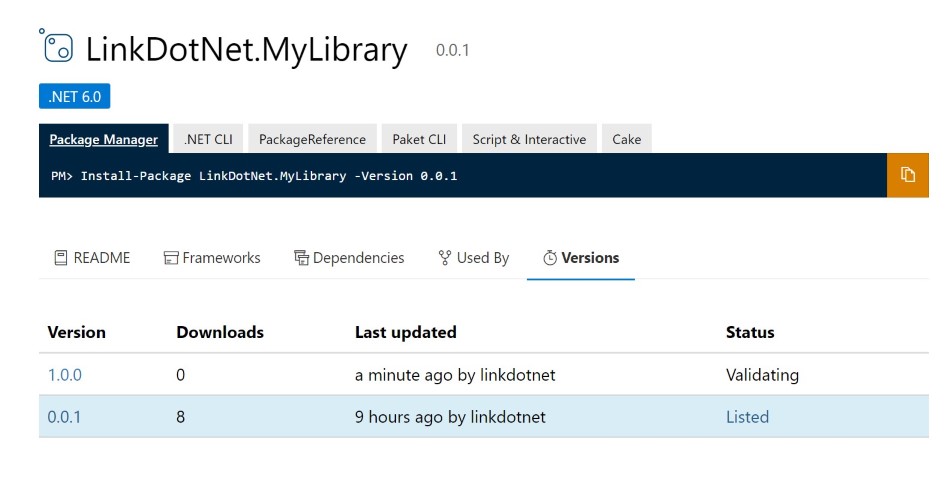
That is perfect! We can also put a checkmark behind that task. And that is basically it. With a matter of a button click we can release a package, create the information and tag on GitHub and update our documentation as well. Of course, you can adopt these workflows as you wish.
Resources
- The template GitHub Repository can be found here