Table of contents
The blog post will show the following mechanism:
- Virtualize
- @key
- Blazor WebAssembly: Lazy loading assemblies
- Blazor WebAssembly: Minimize app download size
- Blazor WebAssembly: AOT compilation
- Pre-render your Blazor App
CascadingValueis fixed- Avoid recreating delegates in loops
- Advanced use case: Override
ShouldRender - Advanced use case:
SetParametersAsyncmanually - Advanced use case:
RenderTreeBuildersequence number - Advanced use case: Blazor WebAssembly: Compress files on static hosting solutions
Virtualize
The Virtualize component allows Blazor to only render components which are currently visible or which will be immediate visible once the user is scrolling. The main advantage is that only resources are allocated and rendered which are in the view field of the user. So if you either have a lot of components or components are "heavy", you will distribute this workload over time.
Another advantage of this is, that your logic doesn't necessarily know that it is initialized "lazy". There is one disadvantage: If you have visually impaired user which are relaying on screen reader and other technologies like that, they will have a harder life. There are some mitigations for that, but features like that or endless scroll are not the best option when it comes to accessibility.
Here a small example:
<div style="height:500px;overflow-y:scroll">
    <Virtualize Items="@ImageUrls">
        <ImageCard ImageUrl="@context"></ImageCard>
    </Virtualize>
</div>
If you want to know more about <Virtualize> I wrote a whole article which goes in depth into the topic. Here you go!
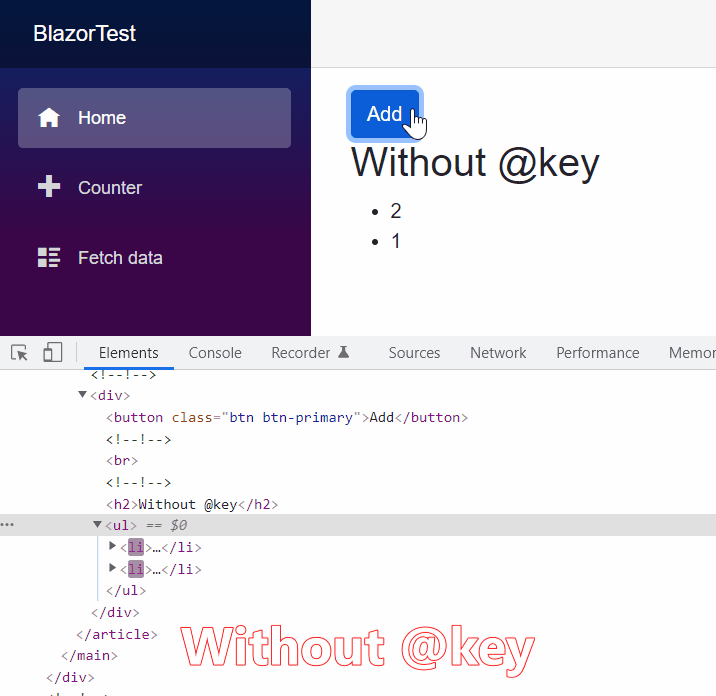
@key
This little helper can safe us precious render time / bandwidth in loops. Why? Normally the Blazor diff engine uses the element index to compare. But if you insert an element at the top (or not at the end) this will not work well.
You can see this behavior clearly in your browser developer tools. One click on "Add" and the whole list gets re-rendered.
Now when we add the @key directive we can give Blazor a hint how to keep track of our collection. And tada in our second example we can see that we just "attach" the new <li> elements on top instead of re-rendering the whole list.
The usage is also very straighforward:
<ul>
    @foreach (var item in items)
    {
        @* With the @key attribute we define what makes the element unique
           Based on this Blazor can determine whether or not it has to re-render
           the element
        *@
        <li @key="item">@item</li>
    }
</ul>
Keep in mind that your @key value has to be unique (like an PRIMARY KEY in SQL). If you have multiple with the same identity, Blazor will throw an exception.
Now @key comes with a bit of a performance penalty by itself. But in a lot of scenarios you gain time by less rendering plus if you use Blazor Server you have to send less Diff inside your SignalR connection.
If you want to know more about @key checkout the Microsoft documentation
Blazor WebAssembly: Lazy loading assemblies
Lazy loading means we are initializing our object only the first time someone asks for it. And we can do the same with assemblies in Blazor. The Blazor Client runtime initializes a connection on the first request and downloads all the .NET code plus your application logic to the client. We can „defer“ some of those assemblies by telling Blazor that we want to load them at the later point in time.
In our csproj we have to tell Blazor which assemblies we want to load later:
<ItemGroup>
  <BlazorWebAssemblyLazyLoad Include="MyCompany.Services.dll" />
</ItemGroup>
It is important that the file extension is part of the identifier. So don‘t skip the .dll at the end. You can have multiple BlazorWebAssemblyLazyLoad properties. One for each assembly you want to defer loading. All dependencies of your assembly should also be lazy loaded to get the smallest initial package.
Now that is not all. We just told Blazor to defer loading those assemblies but we also have to tell Blazor when to really load them. This is done via the LazyAssemblyLoader. More specific we have to extend our App class. We have to tell Blazor on which route we want to load which assemblies.
@using System.Reflection
@using Microsoft.AspNetCore.Components.Routing
@using Microsoft.AspNetCore.Components.WebAssembly.Services
@using Microsoft.Extensions.Logging
@inject LazyAssemblyLoader AssemblyLoader
@inject ILogger<App> Logger

<Router AppAssembly="@typeof(Program).Assembly"
    AdditionalAssemblies="@lazyLoadedAssemblies"
    OnNavigateAsync="@OnNavigateAsync">
    ...
</Router>

@code {
    private List<Assembly> lazyLoadedAssemblies = new();

    private async Task OnNavigateAsync(NavigationContext args)
    {
        try
           {
               if (args.Path == "{PATH}")
               {
                   var assemblies = await AssemblyLoader.LoadAssembliesAsync(
                       new[] { {LIST OF ASSEMBLIES} });
                   lazyLoadedAssemblies.AddRange(assemblies);
               }
           }
           catch (Exception ex)
           {
               Logger.LogError("Error: {Message}", ex.Message);
           }
    }
}
This example is directly taken from here
The obvious downside of this approach is, that we increase our complexity. So his makes only sense if you have large assemblies which are not needed in the initial load.
Blazor WebAssembly: Minimize app download size
If you use some libraries it is very normal that you do not use every little public exposed function. That circumstance helps Blazor to remove those unused symbols when publishing your app. As this is the default for newer versions you should not need to take any further actions. You can see the result if you just build your application vs publishing it: dotnet publish -c Release.
However you can help Blazor with some toggles:
<PropertyGroup>
	<BlazorEnableTimeZoneSupport>false</BlazorEnableTimeZoneSupport>
<PropertyGroup>
This will remove time zone support from your Blazor application. You can check the output _framework/wasm/dotnet.timezones.dat after trimming and publishing. It should be smaller in file size.
<PropertyGroup>
    <BlazorWebAssemblyPreserveCollationData>false</BlazorWebAssemblyPreserveCollationData>
</PropertyGroup>
This will remove collation information from API's. This would affect for example: StringComparison.InvariantCultureIgnoreCase. If you do not require such comparions you can remove this and safe some kB.
Blazor WebAssembly: AOT compilation
AOT will compile your C# code directly into WebAssembly. Normally you will have a layer in between: IL code. To enable AOT compilation you have to add the following to your csproj:
<PropertyGroup>
  <RunAOTCompilation>true</RunAOTCompilation>
</PropertyGroup>
The main advantage of this is, that your code runs much faster than the IL counterpart. But this makes only sense if you have very CPU intensive tasks in your Blazor app. The downside of this approach is, that your .NET assembly with AOT, which gets shipped over the wire to your client, is larger than the IL counterpart. In fact it can be up to 2x larger. Now instead of 2MB your client has to download 4MB for the initial load. So measure first if it makes sense in your scenario. If you want to know more have a look at the Microsoft documentation. There is a mitigation for this initial download hit: Pre-Rendering.
Pre-render your Blazor App
Prerendering means just that we take the first request and pretend to be like a normal ASP.NET Core website. We just render everything and will return the content (static html) to the client (next to the other stuff described above).
Taken from my blog post
For this to work we have to deliver our Blazor App via an ASP.NET Core Website. If we just host for example our Blazor Client app on a CDN, this will not work.
To enable prerendering, you just have to extend your _Layout.cshtml:
<component type="typeof(App)" render-mode="WebAssemblyPrerendered" />
For client-side / WebAssembly
<component type="typeof(App)" render-mode="ServerPrerendered" />
For server side Blazor.`
An in-depth article can be found here in my blog
CascadingValue is fixed
CascadingValues are used t, as the name implies, the cascade a parameter down the hierarchy. The problem with that is, that every child component will listen to changes to the original value. This can get expensive. If your component does not rely on updates, you can pin / fix this value. For that you can use the IsFixed parameter.
<CascadingValue Value="this" IsFixed="true">
    <SomeOtherComponents>
</CascadingValue>
Avoid recreating delegates in loops
Just imagine the following code:
@code {
  @foreach(var item in items)
  {
    <button @onclick="((eventArgs) => DoSomething(eventArgs)">
  }
}
Obviously we could do better, but this is just for the sake of explanation.
Now just imagine the buttons have to be re-rendered (for example due to change in items). As they are lambdas they have to be re-created as well. For smaller amount of controls this is obviously fine, but for larger lists that can get expensive and slow down your performance. The obvious solution in our case:
@code {
  @foreach(var item in items)
  {
    <button @onclick="DoSomething">
  }
}
Now when items change we don't have to create new lambdas all the time.
If you want to see a more advanced case checkout Microsoft documentation.
Disclaimer:
As this are advanced use cases you should not just implement them because it can save you a few percent of rendertime. The next approaches will definitely increase the complexity of your Blazor component. Consider doing benchmarks first and check if the given solution fits your needs!
Advanced use case: Override ShouldRender
Every Blazor Component derives from ComponentBase. ComponentBase offers the following protected function: ShouldRender. In its normal implementation it always returns true. Everytime Blazor goes into a render cycle (for example because on of the parameters value changed), Blazor checks via ShouldRender if it should invoke the render pipeline.
Here is a nice potential improvement. If we know that our component does not to be updated, we can save the render cycle.
The Microsoft documentation has a nice example for that:
@code {
    private int prevInboundFlightId = 0;
    private int prevOutboundFlightId = 0;
    private bool shouldRender;

    [Parameter]
    public FlightInfo? InboundFlight { get; set; }

    [Parameter]
    public FlightInfo? OutboundFlight { get; set; }

    protected override void OnParametersSet()
    {
        shouldRender = InboundFlight?.FlightId != prevInboundFlightId
            || OutboundFlight?.FlightId != prevOutboundFlightId;

        prevInboundFlightId = InboundFlight?.FlightId ?? 0;
        prevOutboundFlightId = OutboundFlight?.FlightId ?? 0;
    }

    protected override bool ShouldRender() => shouldRender;
}
We only want to render when we either the inbound or the outbound flight has changed. If they are the same we can save the re-render.
Please be aware that we increase the complexity of our app to get maybe a slight better performance. On average Blazor can detect changes on its own and can handle such re-renderings intelligently.
Advanced use case: SetParametersAsync manually
Just imagine you have a component with some [Parameter]s
... Some HTML here ...
@code {
  [Parameter]
  public string FirstName { get; set; }

  [Parameter]
  public string LastName{ get; set; }
}
Now some chunk of the time when creating your component is used by mapping the incoming input parameters to the components [Parameter]. This is done via reflection. In normal cases this isn't a big thing, but if you have to render hundreds or thousands of components with many parameters the overhead is noticeable. For that you can implement the logic of mapping on your own. For that you have to override SetParametersAsync.
@code {
  [Parameter]
  public string FirstName { get; set; }

  [Parameter]
  public string LastName { get; set; }

  public override Task SetParametersAsync(ParameterView parameters)
  {
    foreach (var parameter in parameters)
    {
       switch (parameter.Name)
       {
          case nameof(FirstName):
            FirstName = (string)parameter.Value;
            break;
          case nameof(LastName):
            LastName= (string)parameter.Value;
            break;
          default:
            throw new ArgumentException($"Couldn't map {parameter.Name}");
            break;
        }

        // This will tell Blazor that it doesn‘t have to
        // take care of parameters anymore
        return base.SetParametersAsync(ParameterView.Empty);
    }
}
If you want to know more about have a read on the official Microsoft Documentation.
Advanced use case: RenderTreeBuilder sequence number
You might have heart that you can use the RenderTreeBuilder to build your own HTML markup. For building those component you have to give a sequence number. This sequence number is very important for Blazor to detect changes (see @key on top of this blog post where I explained as well that different ordering can cause unnecessary rendering).
@CreateComponent()
@code {
    // Some code here ...
	private RenderFragment CreateComponent() => builder =>
	{
	  var seqNumber = 0;
	  if (someFlag)
	  {
	      builder.AddContent(seqNumber++, "First");
	  }

	  builder.AddContent(seqNumber++, "Second");
	}
}
Now it seems reasonable to take a seqNumber which gets dynamically get increased. But imagine the following scenario.
On the initial rendering someFlag is true. So we have something like that:
Sequence 0 has Data "First" Sequence 1 has Data "Second"
Now someFlag is false. Now we go into our second render:
Sequence 0 has Data "Second"
Hmm. That is a problem because the diff algorithm sees two changes:
- Change of content for Sequence 0
- Delete of Sequence 1
Instead of changing only one element, two have to be changed because we introduced dynamically increased sequence number. Result: Use the same number for the same sequence all the time. In our case this is simple.
private RenderFragment CreateComponent() => builder =>
{
  if (someFlag)
  {
      builder.AddContent(0, "First");
  }

  builder.AddContent(1, "Second");
}
Now everything is fixed independent of the someFlag condition.
Advanced use case: Blazor WebAssembly: Compress files on static hosting solutions
There are cases where your Blazor WebAssembly app is not served via ASP.NET Core where it is super easy to enable compression. If you want to know more about that have a look here.
There are cases where you want to serve your application from static hosters. A good example would be a github page. Here you have no compression. You can achieve that by manually adding Brotli and overloading how the Blazor WebAssembly initial load is handled. For all specific details go to the official Microsoft documentation.
Conclusion
I hope I could give you a nice overview over some techniques to optimize the performance of your Blazor app. If there is something essential missing, please let me know and I will amend this blog post (of course with credits to you).