In this blog post, we will use the Redux pattern with a small Blazor application. To demonstrate the inner workings, we will built everything from scratch.
What is Redux?
Before we go further down - let's explore what the Redux pattern is, why it is useful and how the general flow works.
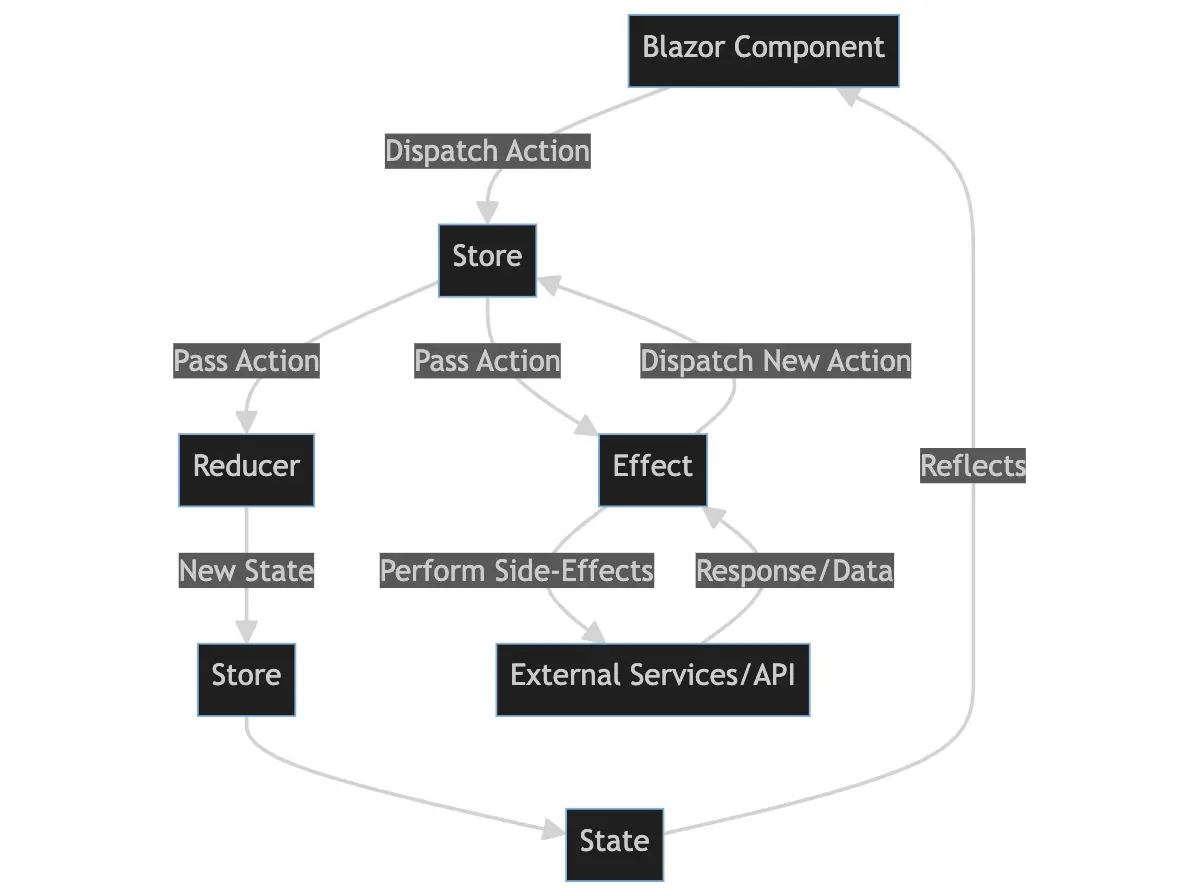
In simple terms the Redux pattern is a way to manage the state of your application. It does that by having a single source of truth, which is the store. The store is a simple object that holds the state of your application. The store is immutable, which means that you can't change it directly. Instead you have to dispatch an action. An action is a simple object that describes what happened in your application. The action is then passed to a reducer. The reducer is a function that takes the current state and the action and returns a new state. The reducer is the only place where you can change the state of your application. The reducer is a pure function, which means that it doesn't have any side effects. It just takes the current state and the action and returns a new state. There are also effects which are used to handle side effects like fetching data from a server. The effects are also pure functions that take the current state and the action and can return a new action itself.
Here is a general overview:

We will look at this in greater detail later when we refactor the "Counter" example of Blazor. But the overall goal is here is to decouple state management from the UI. This makes it easier to test and reason about your application. There are also other advantages:
- Undo/Redo is easy to implement
- "Time travel" debugging (see Redux DevTools)
There are also some downsides to this approach:
- Boiler-plate code to set everything up
- For small applications it might be overkill
- Only useful for applications that have a lot of state (and state changes)
What is a side-effect?
Simply speaking everything that involves "the outside world", like an API call. Also accessing the browser local storage or the DOM is a side effect. Most of the time side-effects are asynchronous by nature.
Redux in Blazor
In the next chapter, we will implement a small Redux pattern ourselves, but please don't do this in production. There are battle-proven libraries out there that do this for you. For example Blazor-State or Fluxor. The next part is educational! The underlying principles stay the same though!
The infrastructure code
Let's start with some code for setting up the Redux stuff. First, have a look at our "Actions" class:
public interface IAction
{
}
This is a simple interface that all actions have to implement. Some implementations are exposing a "Type" property, but we don't need that here.
The next one: Reducer:
public interface IReducer<TState>
{
    TState Reduce(TState state, IAction action);
}
So we can see how both are related: The reducer takes the current state and an action and returns a new state. The reducer is a pure function, which means that it doesn't have any side effects. It just takes the current state and the action and returns a new state. So even if you call the same reducer 1000x with the same state and action, it will always return the same result. This is important for testing and debugging.
Now the first thing we need for our application: Our State! The state is a tree-like structure that holds the state of our application. So normally, you would have one "application state" that in itself consists out of multiple smaller sub-states, so called slices. The idea is that your components not always need the whole state, but rather smaller slices of it. This makes it easier to reason about your application and also makes it easier to test. For our counter example of Blazor, we will have this:
public record CounterState(int Count = 0);
Almost perfection! Records can help you a lot! They provide almost built-in immutability and the syntactic sugar (with keyword) to write easy reducers! Let's wrap that state in a "Application state". Strictly speaking, we don't need that here, as this is our only state, but I want to showcase how a "real" application would handle a ever growing state:
public record ApplicationState(CounterState CounterState);
Let's built our store:
public class Store
{
    private ApplicationState _state;
    private readonly IReducer<ApplicationState> _reducer;

    public Store(IReducer<ApplicationState> reducer)
    {
        _reducer = reducer;
        _state = new ApplicationState(new CounterState());
    }

    public ApplicationState GetState() => _state;

    public void Dispatch(IAction action)
    {
        _state = _reducer.Reduce(_state, action);
    }
}
We could further decouple our logic of having the reducer inside the store as a dependency - thing of MediatR here. We could just send around messages, that get picked up by an INotificationHandler that is, by plain accident, our reducer. But for now, let's keep it simple.
Last but not least, we need our reducers.
public class AppReducer : IReducer<ApplicationState>
{
    private readonly CounterReducer _counterReducer = new();

    public ApplicationState Reduce(ApplicationState state, IAction action)
    {
        return new ApplicationState(_counterReducer.Reduce(state.CounterState, action));
    }
}

public class CounterReducer : IReducer<CounterState>
{
    public CounterState Reduce(CounterState state, IAction action)
    {
        return action switch
        {
            IncrementAction incrementAction => state with { Count = state.Count + 1 },
            _ => state
        };
    }
}
That said - we also have to define the "IncrementAction":
public record IncrementAction : IAction
{
}
This will be handled then by the CounterReducer and will increment the counter by one. We could extend the action to have a value on how much the value should be incremented:
public record IncrementAction(int Value) : IAction
{
}

public class CounterReducer : IReducer<CounterState>
{
    public CounterState Reduce(CounterState state, IAction action)
    {
        return action switch
        {
            IncrementAction incrementAction => state with { Count = state.Count + incrementAction.Value },
            _ => state
        };
    }
}
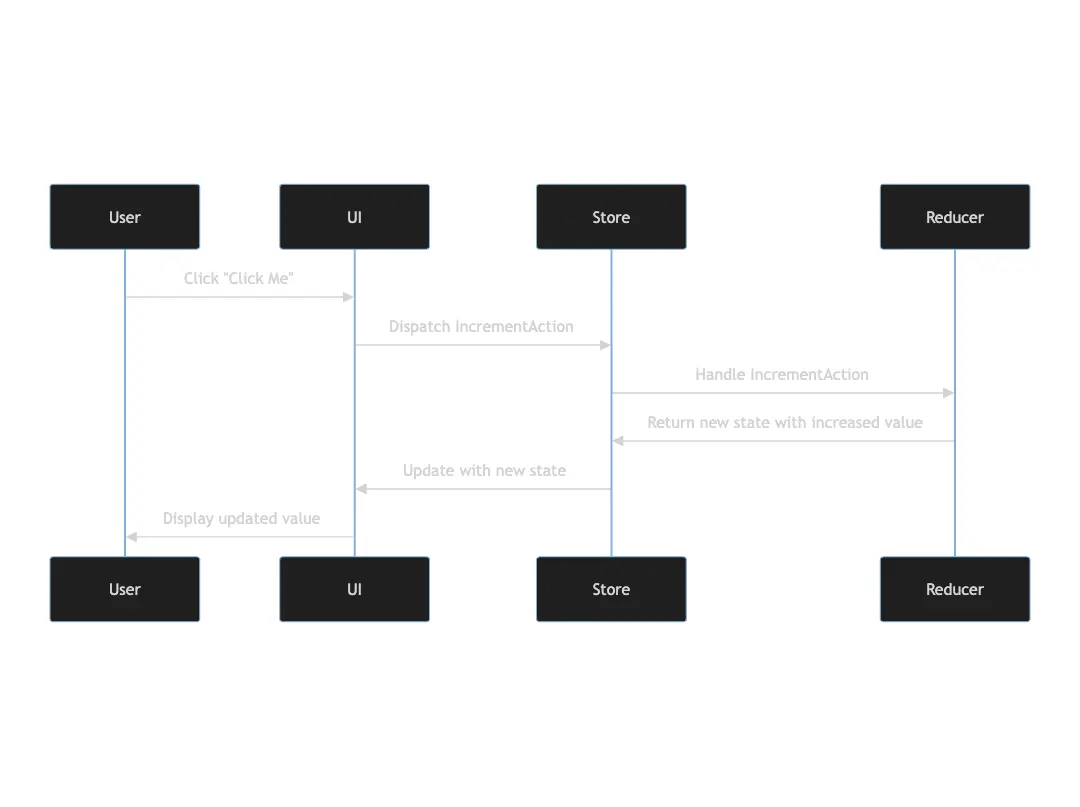
But now we are in place. As mentioned earlier, there is some boiler plate involved! But now we can use our store in our Blazor application. To give you a better understanding and recap, here the sequence:

@page "/counter"
@inject Store Store

<PageTitle>Counter</PageTitle>

<h1>Counter</h1>

<p role="status">Current count: @State.Count</p>

<button class="btn btn-primary" @onclick="IncrementCount">Click me</button>

@code {
    private CounterState State => Store.GetState().CounterState;

    private void IncrementCount()
    {
        Store.Dispatch(new IncrementAction(1));
    }
}
As you can see, we inject our store and then use it to get the current state. We also dispatch an action to increment the counter. That's it! We completely decoupled the state management from the UI. We could polish that a bit further but let's keep it for now! I will link this source code and further materials!
More thoughts
So how would you load the initial data for your application? Well - you can just create a new action called LoadMyDataAction that get's handled by an effect, that will load the data from an API. Once that is done, this effect will dispatch itself a new action called LoadMyDataSuccessAction that will be handled by a reducer. This reducer will then update the state of your application. If it fails, you can dispatch a LoadMyDataFailedAction and act accordingly.
Resources
- Source code to this blog post: here
- All my sample code is hosted in this repository: here
- Redux JS: https://redux.js.org/tutorials/fundamentals/part-7-standard-patterns


