I already showcased a simple modal dialog in a previous post. However, the dialog was not awaitable. In this post, I'll show you how to create an awaitable modal dialog.
An awaitable modal dialog
While callbacks are very nice, sometimes it is just way more convenient to await a dialog. Something likes this:
var result = await MyDialog.ShowAsync();
if (result is null)
{
    // The user pressed "Cancel"
}
else
{
    // The user pressed "Ok"
}
To make this work, we can utilize the power of TaskCompletionSource<T>. This class allows us to create a Task<T> that we can complete whenever we want. This is perfect for our use case. I also have a blog post about this: "Wrap Event based functions into awaitable Tasks - Meet TaskCompletionSource".
The Dialog
I used this recently in the following component, that asks the user for a filename and an optional flag:
<div class="modal @modalClass" tabindex="-1" role="dialog" style="display:@modalDisplay; overflow-y: auto;">
    <div class="modal-dialog modal-lg" role="document">
        <div class="modal-content">
            <div class="modal-header">
                <h5 class="modal-title">Configuration</h5>
                <button type="button" class="btn-close" @onclick="OnAbort"></button>
            </div>
            <div class="modal-body">
                <EditForm Model="@model" OnValidSubmit="OnOk">
                    <DataAnnotationsValidator />
                    <div class="form-floating mb-3">
                        <InputText type="text" class="form-control" id="name" placeholder="Filename"
                            @bind-Value="model.Name" />
                        <label for="name">Filename</label>
                        <ValidationMessage For="() => model.Name"></ValidationMessage>
                    </div>
                    <div class="form-check form-switch mb-3">
                        <InputCheckbox class="form-check-input" id="cache" @bind-Value="model.CacheMedia" />
                        <label class="form-check-label" for="cache">Enable Media Caching</label><br />
                        <small class="form-text text-body-secondary">If enabled, the browser will cache the media file</small>
                    </div>
                </EditForm>
            </div>
            <div class="modal-footer">
                <button type="button" class="btn btn-secondary" @onclick="OnAbort">Abort</button>
                <button type="button" class="btn btn-primary" @onclick="OnOk">OK</button>
            </div>
        </div>
    </div>
</div>

@if (showBackdrop)
{
    <div class="modal-backdrop fade show"></div>
}

@code {
    private TaskCompletionSource<UploadFileModalDialogObject?> result = null!;
    private string modalDisplay = "none;";
    private string modalClass = "";
    private bool showBackdrop;
    private readonly UploadFileModalDialogObject model = new();

    public async Task<UploadFileModalDialogObject?> ShowAsync(string fileName)
    {
        modalDisplay = "block;";
        modalClass = "show";
        showBackdrop = true;
        model.Name = fileName;
        result = new TaskCompletionSource<UploadFileModalDialogObject?>();
        StateHasChanged();
        return await result.Task;
    }

    private void OnAbort()
    {
        modalDisplay = "none";
        modalClass = "";
        showBackdrop = false;
        result.SetResult(null);
        StateHasChanged();
    }

    private void OnOk()
    {
        modalDisplay = "none";
        modalClass = "";
        showBackdrop = false;
        result.SetResult(model);
        StateHasChanged();
    }
}
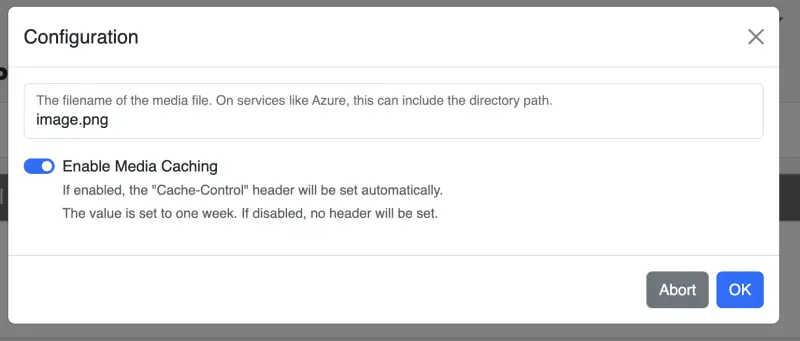
It looks like this:

The interesting bid is the ShowAsync method. It sets up the dialog and returns the Task that we can await. The OnAbort and OnOk methods are called when the user presses the corresponding button. They set the result and close the dialog (with the given result).
As discussed in "Wrap Event based functions into awaitable Tasks - Meet TaskCompletionSource", we can make event driven (aka the button clicks) functions awaitable by using TaskCompletionSource<T>. This is exactly what we did here.
Usage
I have a component where I do open this dialog when the user drag 'n drops a file onto the page:
<UploadFileModalDialog @ref="UploadDialog"></UploadFileModalDialog>

@code {
    private UploadFileModalDialog UploadDialog { get; set; } = default!;

    private async Task OnDrop(InputFileChangeEventArgs e)
    {
        var file = GetFile(e);

        var result = await UploadDialog.ShowAsync(file.Name);
        if (result is null)
        {
            return;
        }

        // Upload file
        ...
    }
}
Conclusion
Creating an awaitable dialog is quite simple. We just need to use a TaskCompletionSource<T> to create a Task<T> that we can complete whenever we want. This allows us to await the dialog and get the result when the user closes the dialog.


