Welcome back to our series: How to create a todo app with the Uno platform. As a small recap we created in the last part of the series a nice form which also validates our model. That looked fancy but that was the end of the show. We will start exactly from there and add the element into the right swimlane.
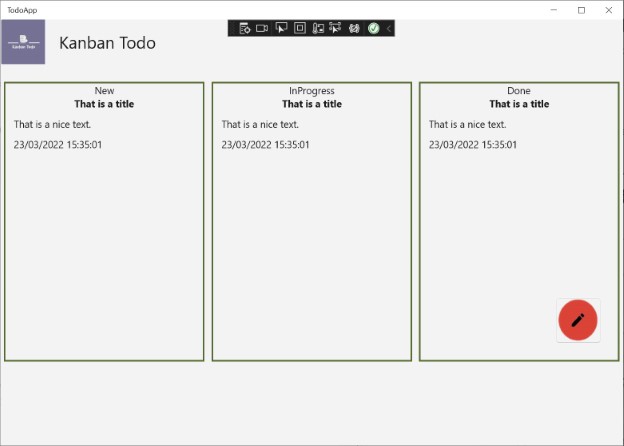
A small teaser where we are going:
Return the item
Our dialog was capable of creating the todo item and only allows the user the press "Add" when the model is in a valid state. You might be surprised but we are done with the dialog itself. As we attached the viewmodel to the DataContext of our dialog, we can use this from our button. Remember the press on the red button opened the dialog. So here is our next stop:
public event EventHandler<Todo> TodoItemCreated;

private void OpenDialog(object sender, RoutedEventArgs args)
{
    var dialog = new AddTodoItemDialog();

    // We will hook into the PrimaryButtonClick here
    dialog.PrimaryButtonClick += (s, a) => NewTodoItemCreated((NewTodoItemViewModel)dialog.DataContext);
    dialog.ShowAsync();
}

private void NewTodoItemCreated(NewTodoItemViewModel viewModel)
{
    var todo = new Todo
    {
        Description = viewModel.Description,
        Title = viewModel.Title,
        DueDate = viewModel.DueDate.DateTime,
        KanbanState = KanbanState.New,
    };

    TodoItemCreated?.Invoke(this, todo);
}
The idea is simple:
- Attach to the
PrimaryButtonClickwhich in fact is our Add button - Create our domain object from the view model and raise the newly created
TodoItemCreatedwith that item
Now the parent is responsible to subscribe to TodoItemCreated-event and do something with it. The parent of our button is the MainPage itself. So it will be time to do some work here.
MainPage.xaml
View Model
Before we do anything we the event, we need some kind of storage. We will use a newly created view model to do so. Our ViewModel is fairly simple:
MainPageViewModel.cs
using MvvmHelpers;
using TodoApp.Domain;

namespace TodoApp
{
    public class MainPageViewModel : ObservableObject
    {
        private ObservableRangeCollection<Todo> todoItems = new ObservableRangeCollection<Todo>();

        public ObservableRangeCollection<Todo> TodoItems
        {
            get => todoItems;
            set
            {
                todoItems = value;
                OnPropertyChanged();
            }
        }
    }
}
We just have an ObservableCollection which holds all of our Todo items. The ObservableCollection has the advantage that it works nicely with the Uno Platform (like in WPF or UWP). So everytime we add an element, all the bindings get notified so we don't have to do this in our own.
Now that we have some kind of state, we can hook into the event from our button and add the element to the list.
Put the item into our view model
As with all C# events we just attach ourselves in the code behind and add the newly created item to our view model:
MainPage.xaml.cs
public sealed partial class MainPage : Page
{
    public MainPage()
    {
        InitializeComponent();
        DataContext = new MainPageViewModel();
        addItemButton.TodoItemCreated += (o, item) => ((MainPageViewModel)DataContext).TodoItems.Add(item);
    }
}
Before we continue one important fact which we will leverage next: DataContext gets automatically inherited by child components if not overwritten. That means that our Swimlane automatically has now all the Todo items even though we never explicitly declared this. In this tutorial I will use that fact and don't create a separate view model for the Swimlane.
Adding it to the Swimlane
As described above, we are already added this new item indirectly to our Swimlane as the Swimlane inherits the DataContext from the MainPage.
Let's just add some content to the Swimlane. We already started a bit, but in theory nothing is shown. So we will extend our <ListView.ItemTemplate>. Also we will set the ListView.ItemContainerStyle to use the whole width of the StackPanel.
Swimlane.xaml
<UserControl
    x:Class="TodoApp.Swimlane"
    xmlns="http://schemas.microsoft.com/winfx/2006/xaml/presentation"
    xmlns:x="http://schemas.microsoft.com/winfx/2006/xaml"
    xmlns:local="using:TodoApp"
    xmlns:d="http://schemas.microsoft.com/expression/blend/2008"
    xmlns:mc="http://schemas.openxmlformats.org/markup-compatibility/2006"
    mc:Ignorable="d"
    d:DesignHeight="300"
    d:DesignWidth="400">

    <StackPanel MinWidth="200" MinHeight="400" BorderBrush="DarkOliveGreen" BorderThickness="2">
        <TextBlock Text="{x:Bind State}" HorizontalAlignment="Center"></TextBlock>
        <ListView x:Name="itemListView" HorizontalContentAlignment="Stretch">
            <ListView.ItemContainerStyle>
                <Style TargetType="ListViewItem">
                    <Setter Property="HorizontalContentAlignment" Value="Stretch"/>
                </Style>
            </ListView.ItemContainerStyle>
            <ListView.ItemTemplate>
                <DataTemplate>
                    <local:TodoItem></local:TodoItem>
                </DataTemplate>
            </ListView.ItemTemplate>
        </ListView>
    </StackPanel>
</UserControl>
Hupps, there is now something missing: The TodoItem user control. For now we will hold it very simple. We just show all the properties we have in a StackPanel. Therefore create a new Uno Platform User Control:
TodoItem.xaml
<UserControl
    x:Class="TodoApp.TodoItem"
    xmlns="http://schemas.microsoft.com/winfx/2006/xaml/presentation"
    xmlns:x="http://schemas.microsoft.com/winfx/2006/xaml"
    xmlns:local="using:TodoApp"
    xmlns:domain="using:TodoApp.Domain"
    xmlns:d="http://schemas.microsoft.com/expression/blend/2008"
    xmlns:mc="http://schemas.openxmlformats.org/markup-compatibility/2006"
    mc:Ignorable="d"
    d:DataContext="{d:DesignInstance Type=domain:Todo}"
    d:DesignHeight="300"
    d:DesignWidth="400">
    <StackPanel>
        <TextBlock Text="{Binding Path=Title}" TextAlignment="Center" FontWeight="Bold"></TextBlock>
        <TextBlock Text="{Binding Path=Description}" Margin="0,10,0,0"></TextBlock>
        <TextBlock Text="{Binding Path=DueDate}" Margin="0,10,0,0"></TextBlock>
    </StackPanel>
</UserControl>
Also here we will use the DataContext. The DataContext from the point of view of our TodoItem is not the ObservableCollection anymore but one single TodoItem. Perfect! By the way with: d:DataContext="{d:DesignInstance Type=domain:Todo}" you can help IntelliSense to show you the right properties.
Looks like we are done, or? Let's hit the compiler and look what we have created:
Hmmm we don't want to have that single Todo item in all of our lanes. One Swimlane is responsible for one KanbanState.
The thing is all of our swimlane see the same content. Until now they don't know how to filter anything.
Filter the swimlanes
To filter our Swimlanes according to the previous set state we will leverage a nice component: AdvancedCollectionView. The AdvancedCollectionView is part of the Community Toolkit.
Now the very cool thing with the Uno Platform is that they ported the community toolkit. If you want to know more go here. I will just briefly summarize and guide you through with the most important points.
For our case we need to add the Uno.Microsoft.Toolkit.Uwp.UI nuget package, but:
- Only add the
Uno.Microsoft.Toolkit.Uwp.UIto every production project besides the UWP or WinUI3 head - For UWP or WinUI3 head use
Microsoft.Toolkit.Uwp.UI - Keep the versions aligned. In my case both packages have version
7.1.1. - Uno platform* is totally aligned with the name of the packages. They just prefixed it with Uno
- The namespaces are also the same
Now that we added the package(s). We can use the AdvancedCollectionView.
For that we go into Swimlane.xaml.cs:
public Swimlane()
{
    InitializeComponent();
    DataContextChanged += SetFilter;
}

private void SetFilter(FrameworkElement sender, DataContextChangedEventArgs args)
{
    var view = new AdvancedCollectionView(((MainPageViewModel)this.DataContext).TodoItems, true);
    view.Filter = item => ((Todo)item).KanbanState == State;
    itemListView.ItemsSource = view;
}
Now what are we doing here. Once the DataContext is loaded or changed (via DataContextChanged) we apply our Filter method. We already introduced the State in an eariler episode of the series (to use it in the header). Last but not least we set the ItemsSource of our ListView to the newly created and filtered AdvancedCollectionView. Very straight forward!. Now if you compile again and run the application you see the image as shown at the beginning:
Something which bugged me was that the "default" date for our NewTodoItemViewModel is basically default(DateTimeOffset) which is 1922. We can easily address this via: private DateTimeOffset dueDate = DateTimeOffset.Now;.
And there you go. We added our todo item into the right column and also did the ground work for further adjustments.