Let's have a closer look at the UNO Platform. And what is better than hands on experience? Therefore we will create a Todo app Kanban-style.
What is the UNO Platform
I will quote directly the github repository:
The Uno Platform is a UI Platform for building single-codebase applications for Windows, Web/WebAssembly, iOS, macOS, Android and Linux. It allows C# and WinUI XAML code to run on all target platforms, while allowing you control of every pixel. It comes with support for Fluent, Material and Cupertino design systems out of the box. Uno Platform implements a growing number of the WinRT and WinUI APIs, such as Windows.UI.Xaml, to enable WinUI applications to run on on all platforms with native performance.
Think of it as "Flutter for C#", instead of Dart we are using C# and XAML as UI description language. And one thing in advance UNO is open source under the apache license. It has over 6000 stars with over 210 contributors. That are very good conditions to be accepted by a wide range of developers.
And we gonna create a small App which runs in your browser, desktop or mobile phone which handles your Todo tasks. To organize we do it Kanban style with multiple swimlanes where you can drag your items from one swimlane to another.
How does it differ to .NET MAUI?
.NET MAUI and the UNO Platform shared a lot of similarities:
- both are open source
- both meant for writing cross-platform code in C# with XAML as interface description language
- compile once, run everywhere
- support multiple platforms (Windows, Android, MacOs, iOs… basically mobile and desktop)
- If you need platform specific code, you can do this with both frameworks (also in the same fashion via
#ifdef).
But there are also differences between them:
- The most important one, MAUI is still in preview where as the UNO Platform is ready since 2018. If you have to build a cross platform app today UNO Platform would be the framework of your choice
- UNO Platform supports a few more platforms like Linux and the Web (especially the latter one can be a good reason to take the UNO Platform now instead of MAUI).
- Take the next one with a grain of salt: UNO is migrating to WinUI 3 (currently using UWP which goes end of life). I don't know the current state for MAUI. As developer or user of the library that is not necessary important as this just describes the underlying API model which the UNO Platform uses. There is a blog post by the team itself which explains the situation.
- UNO Platform offers you either have native controls across all platforms or to have a unified look (a button looks the same on all platforms). See here.
Setup
Before we get started with code we need to setup our IDE and environment. If you want to read the whole documentation you can check out the Get Started page from the UNO Platform. I will highlight two ways: Microsoft Visual Studio 2022 and JetBrains Rider. Unfortunately JetBrains Rider refused to give me XAML support, therefore I will stick with Visual Studio 2022 for the time being.
Visual Studio 2022
To make everything work you need 3 workloads which you can install via the Visual Studio Installer:
- UWP workload
- Mobile development with .NET (Xamarin)
- ASP.NET and web


Now only one thing is missing: We need the Visual Studio Solution templates, which scaffold all the code for us. To do so go in your Visual Studio to Extensions in the menu and click on Manage Extensions. Under online you can search for UNO Platform Solution Templates. You are all set.
JetBrains Rider / Command Line
At the moment there is no template for Rider unfortunately. The only way to make it work is via the command line tools.
- First install the template via command-line:
dotnet new -i Uno.ProjectTemplates.Dotnet - Create a new project:
dotnet new unoapp -o MyFancyApp
What I noticed is that the templates are different. The former one (Visual Studio extensions) seems to be a subset of the latter one (provided by the command line). Here a direct comparison:

There is a comprehensive overview over all the different templates the UNO Platform offers: here. You can also create projects without iOS or Android support if you wish.
uno-check
There is also a handy tool called: uno-check which is basically a dotnet global tool. It can check if everything is ready.
First you have to install the tool via: dotnet tool install --global Uno.Check. Then you most likely have to open a command line with administrative rights as the tool can also install workloads and stuff. Once you have a shell with administrative rights you can call the tool via: uno-check and it will tell you what is missing and is even trying to fix it if you want to.
You can see that I did not download all the stuff for Android development. Mainly because I do not have an Android phone
For me that is a big plus: I like such automation!
Create the Todo App
Now let's create our App as well as having a look at the whole folder structure.
dotnet new unoapp -o TodoApp
This will scaffold all the necessary files. We can see that we have a lot of new folders. Let me explain what they do. You can also head to the documentation of the UNO Platform for more information.
TodoApp/
+- TodoApp.Droid/ -- Head for Android
+- TodoApp.iOS/   -- Head for iOS
+- TodoApp.macOS/ -- Head for macOS
+- TodoApp.Shared/ -- Here goes the main chunk of your code
+- TodoApp.Skia.Gtk/ -- Used for Gtk stuff
+- TodoApp.Skia.Linux.Framebuffer/ -- Used for linux machines without window managers (has limitations)
+- TodoApp.Tizen/ -- Head for Tizen
+- TodoApp.WPF/ -- Head for WPF
+- TodoApp.WPF.Host/ -- This is used for making WASM debugging easier (WPF  )
+- TodoApp.UWP/ -- Head for UWP
+- TodoApp.WASM/ -- Head for WASM
Now let's sort out terminology:
- Head means it builds and packages the project for that specific platform. If you need special information or platform-specific code. That goes here.
- Skia is an open source rendering library on linux.
- Shared here lays your UI and business logic.
- More information can be found: here
It is crucial to understand that the Shared project is more or less just a container for files which then get "interpreted" by the Head to create the platform specific code. That brings unfortunately a limitation: You can not add references like nuget packages directly to your Shared project which then have to go automatically to all Head projects. You have to add those dependencies to all Head projects to make that work. But there is a neat workaround, which I had in my blog earlier: You can leverage: Directory.Build.props. So you could put all "shared" references in their.
Let's open the newly created solution and just build it. I really would propose don't just press F5, really build the whole solution. I encountered some issues when just pressing F5 after opening the solution the first time and trying to open the WASM Head.

I took the opportunity to exchange the "Hello World" to "Hello dear Reader". So you see something similar like that:

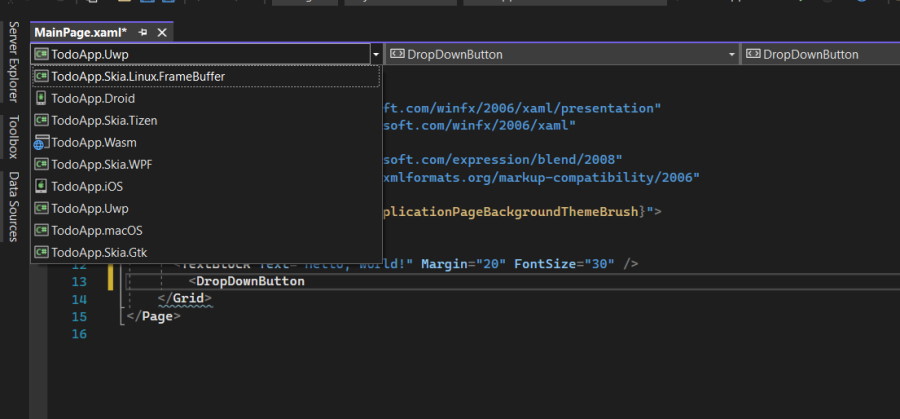
Now one thing to get Visual Studio's Intellisense to work, when you open a xaml file you have to switch in the top left corner to UWP like that:

That looks very nice until now. I only want to add one small thing: tests. In this particular case I want to add the UNO Platform UI Tests.
We can do this also via the command line tools (alternatively in Visual Studio you will find the UNO Platform UI test project template): dotnet new unoapp-uitest -o tests/UI.Tests.
Now you can see that I added the UI tests in a subfolder tests. I like to separate the test code from my production code. This is purely up to you how to deal with that.
I will also go one step further and move all production files into a src folder, so that my final working directory looks like this. Be aware if you move files around you have to adopt your solution file(s). For Mac-Users: There is a TodoApp-vsmac.slnf which is a solution file with filters. You also have to change this file.
New folder structure:
TodoApp/
+- src/
¦  +- TodoApp.Droid/
¦  +- TodoApp.iOS/
¦  +- TodoApp.macOS/
¦  +- TodoApp.Shared/
¦  +- TodoApp.Skia.Gtk/
¦  +- TodoApp.Skia.Linux.Framebuffer/
¦  +- TodoApp.Tizen/
¦  +- TodoApp.UWP/
¦  +- TodoApp.WASM/
¦  +- TodoApp.WPF/
¦  +- TodoApp.WPF.Host/
+- tests/
¦  +- UI.Tests/
Sure in tests there could be way more tests like your business logic etc.
Conclusion
That was a good first start. We have our building blocks to build our app. My takeaway from that:
What went well
- The documentation is very good. I checked the website as well as the github page when I encountered issues. And I always found my answer
- If you are used to XAML / Xamarin.Forms you have no problems jumping in
- The automated tools and template are very nice!
- Easy collaboration with your designer (FIGMA support - more to that in a second)
- Github codespace integration: here more information including its own extension
What could be better
- Sometimes exceptions where only going away with
Clean & Build. F5 initially did not work for me. - Due to the architecture Shared can not contain references to external dependencies / projects. Let's see how this plays out.
UNO - Figma
The UNO Platform offers a nice integration with Figma. The basic idea is that you can export your assets in Figma to XAML code, which you can directly use in your app. That is a huge win. When you talk with your designer and want to see those live changes it is just a matter of clicks. That is awesome.
For more information check out the official website.
What's next
Now we just setup everything without writing a line of code. But it was very important for me that you understand how everything works to get that full picture. The next part of the series will be about building the app itself, because we did not do this until now. Head over to Part 2 of the series.

